Monday, October 21, 2019

Adding Color to Your Output From C

ANSI Colors


We have 8 ANSI colors that we can use in our output, this can be doubled to 16 if you take into consideration that these colors can be displayed as standard or in bold for highlighting. To be able to access the colors we need to use and escape sequence followed by the correct color code, the print the text and finally reset the colors.
  • printf(“\033[0;31m”); //Set the text to the color red
  • printf(“Hello\n”); //Display Hello in red
  • printf(“\033[0m”); //Resets the text to default color
  • Escape is: \033
  • Color code is: [0;31m
It is important to reset the color to ensuring that the selected color is terminated and text returns to normal. Using the following table you can view some of the code available.
CODECOLOR
[0;31mRed
[1;31mBold Red
[0;32mGreen
[1;32mBold Green
[0;33mYellow
[01;33mBold Yellow
[0;34mBlue
[1;34mBold Blue
[0;35mMagenta
[1;35mBold Magenta
[0;36mCyan
[1;36mBold Cyan
[0mReset

Simple Hello World in Color

Working with a simple hello world program we can begin to understand how to make use of the color. Firstly we will set the color to be red and bold before moving onto using functions to set the color.
#include <stdio.h>
int main () {
  printf("\033[1;31m");
  printf("Hello world\n");
  printf("\033[0m;")
  return 0;
}
Adding color to the output was really quite simple; however setting many colors or changing the colors many times will be repetitive. Setting the color often and using more than one color is going to be required where we want to highlight the output with information and warnings.

Using Functions

This is where function can help. It is simple to create functions for red, yellow etc. Let’s take a look.
#include <stdio.h>
void red () {
  printf("\033[1;31m");
}

void yellow {
  printf("\033[1;33m");
}

void reset () {
  printf("\033[0m");
}

int main () {
  red();
  printf("Hello ");
  yellow();
  printf("world\n");
  reset;
  return 0;
}
We can use the newly created functions as many time as we want and it is as simple as yellow(); reset(); or red(); We, of course, can create more functions to support all colors.
Using the functions the way we have we do not need to return any values. The functions result only in printing the ANSI color codes to the terminal. As we do not return any value then we set the output parameter explicitly to void.

Moving On

It is also likely that we can reuse these function in almost any C program that has text output. In another blog we will see how we can reuse this code by creating and referencing our own header files.
The following video steps you through the process of printing in color.

Tuesday, October 8, 2019

I2C interface

Cách đánh địa chỉ
 I²C sử dụng 7 bit để định địa chỉ, do đó trên một bus có thể định địa chỉ tới 112 nút, 16 địa chỉ còn lại được sử dụng vào mục đích riêng. Bit còn lại quy định việc đọc hay ghi dữ liệu (1 là write, 0 là read)
Ví dụ:
– Địa chỉ của một thiết bị là 0x20. Khi cần đọc vào thiết bị này thì thanh ghi sẽ có giá trị 0x40 (thêm bit 0) còn khi ghi thì giá trị là 0x41 (thêm vào 0).
Điểm mạnh của I²C chính là hiệu suất và sự đơn giản của nó: một khối điều khiển trung tâm có thể điều khiển cả một mạng thiết bị mà chỉ cần hai lối ra điều khiển.
Ngoài ra I2C còn có chế độ 10bit địa chỉ:
5
Cách truyền dữ liệu bằng I2C 
10
Start bit and stop bit.

6
Lưu đồ quá trình truyền nhận dữ liệu sữ dụng I2C interface.
11
Chú ý: ASK là bit do slave truyền chứ ko phải do master truyền

Monday, October 7, 2019

PHÂN LOẠI CÁC VÙNG NHỚ (STACK & HEAP)

Trong một chương trình ta thấy bộ nhớ ảo được chia thành nhiều phân vùng khác nhau và được sử dụng cho những mục đích khác nhau. Dưới đây là hình ảnh minh học cho thứ tự các phân vùng trên vùng nhớ ảo

Code segment(.text): là noi lưu trữ các mã lệnh được biên dịch thành mã máy.

Data segment(.data): là nơi lưu trữ các biến static, biến toàn cục của các chượng trình.

BSS segment (.bss): là nơi lưu trữ các biến static, biến toàn cục nhưng chưa được khởi tạo giá trị cụ thể.

Heap segment: được sử dụng để cấp phát bộ nhớ thông qua kỹ thuật Dynamix memory allocation.

***Trong C chúng ta có những hàm sao:

FunctionPurpose
mallocAllocates the memory of requested size and returns the pointer to the first byte of allocated space.
callocAllocates the space for elements of an array. Initializes the elements to zero and returns a pointer to the memory.
reallocIt is used to modify the size of previously allocated memory space.
FreeFrees or empties the previously allocated memory space.
*** Trong C++ chúng ta dùng:
new int; //allocate 4 bytes on Heap segment
new int[10]; //allocate (4 * 10) bytes on Heap segment
Stack segment: call stack thường được gọi là stack, được dùng để cấp phát bộ nhớ cho tham số các hàm (function parameters) và biến cục bộ (local variables).
 - call stack được thực hiện theo cấu trúc dữ liệu stack (stack data structure).

Friday, October 4, 2019

Getting Startesd With GR Peach and E2 Studio

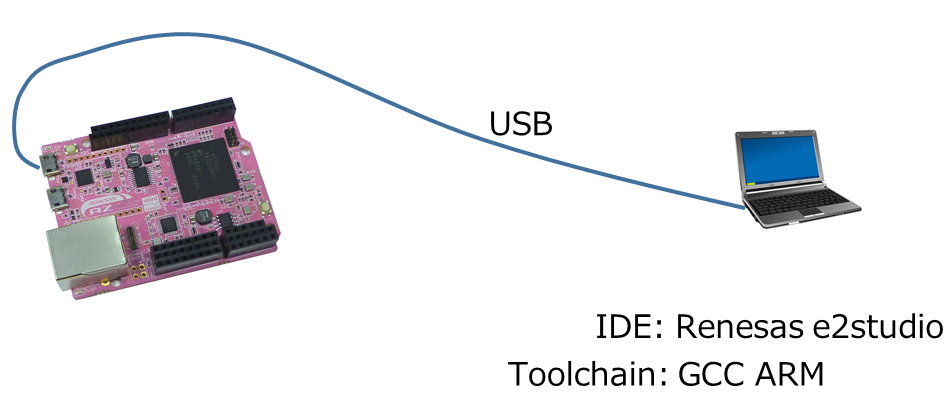
/media/uploads/RyoheiHagimoto/e2studio-cmsisdap-component.png
If you would like to use J-Link for debugging, please refer to Exporting to e2studio (J-Link debug).

Setup Procedure

Install Windows serial driver

Install latest Windows Serial Port Driver to setup CMSIS-DAP from the link below:
https://mbed.org/handbook/Windows-serial-configuration

Install e2studio

Please download e2studio 5.0.0 or lator, and install

Install OpenOCD

Please download exe file of OpenOCD v0.10.0-201601101000-dev, and install.

Associate GR-PEACH config with OpenOCD

Please copy renesas_gr-peach.cfg to scripts\board directory included in the OpenOCD installed location. By default, it should be located as follows:
  • In case of using 32-bit windows:
    C:\Program Files\GNU ARM Eclipse\OpenOCD\0.10.0-201601101000-dev\scripts\board
  • In case of using 64-bit windows:
    C:\Program Files (x86)\GNU ARM Eclipse\OpenOCD\0.10.0-201601101000-dev\scripts\board

Install OpenOCD add-in to e2studio

Information

This procedure can be skipped when you use e2studio version 5.2 or later since the add-in is incorporated in e2studio.
  1. Launch e2studio.
  2. Select[Help]menu→[Install new software...]
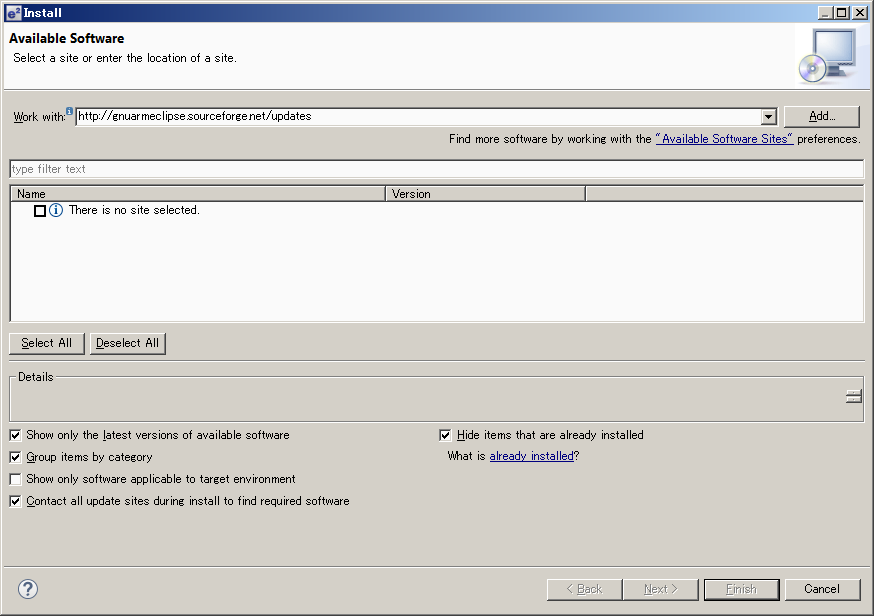
  3. Input http://gnuarmeclipse.sourceforge.net/updates to [work with] box, and push [Add] button.
    /media/uploads/RyoheiHagimoto/e2studio-add-soft.png
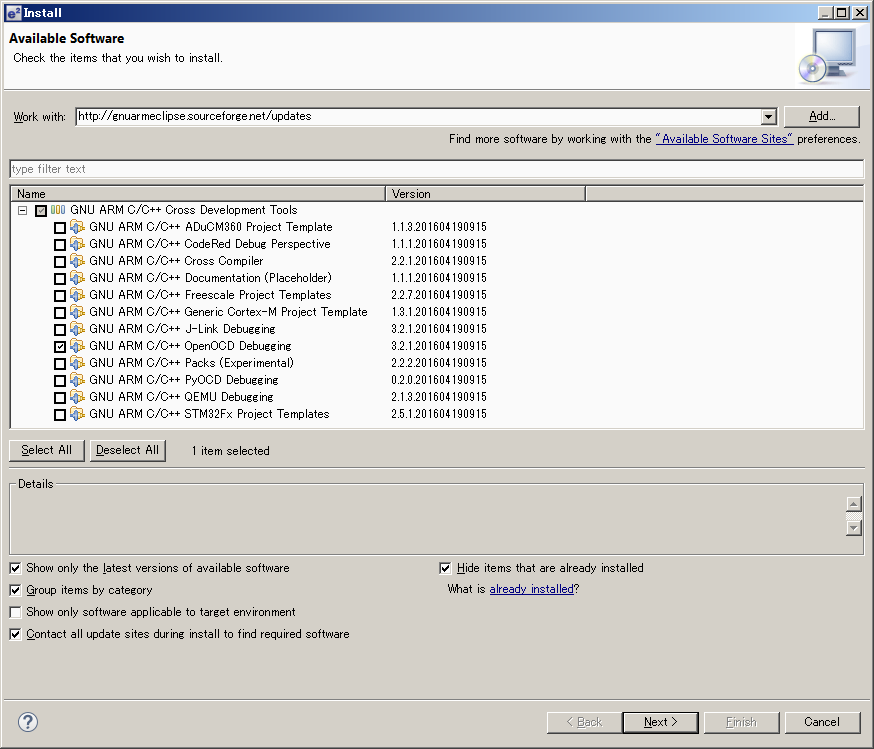
  4. Check [GNU ARM C/C++ OpenOCD Debugging] and push [Next >] button.
    /media/uploads/RyoheiHagimoto/e2studio-add-soft02.png
  5. Install and restart e2studio.

Configure OpenOCD on e2studio

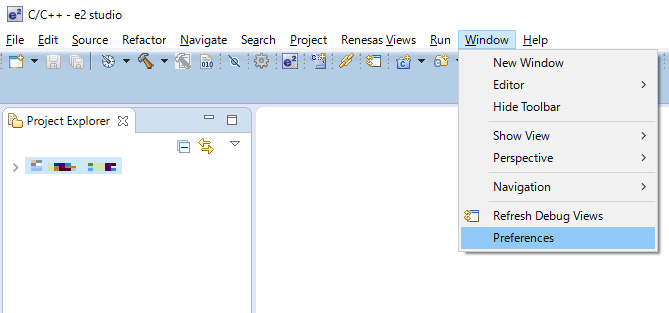
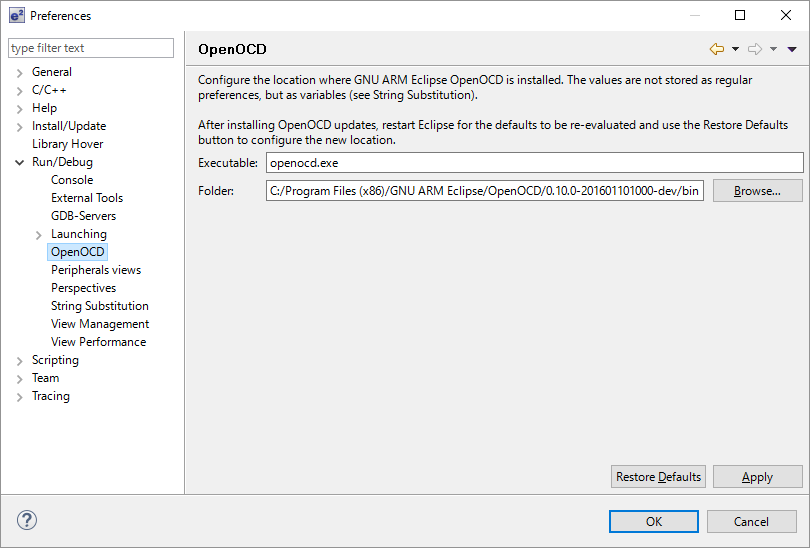
  1. Select [Window] -> [Preferences]. /media/uploads/HinoNaka/openocd_config1.png
  2. Select [Run/Debug] - [OpenOCD]. /media/uploads/HinoNaka/openocd_config3.png
  3. Check if the directory and executable are filled with OpenOCD installation folder and openocd.ex respectively. If not, please input OpenOCD installation folder and openocd.exe there and click [OK]. Note that the default OpenOCD installation folder should be as follows:
  • In case of using 32-bit windows:
    C:/Program Files/GNU ARM Eclipse/OpenOCD/0.10.0-201601101000-dev/bin
  • In case of using 64-bit windows:
    C:/Program Files (x86)/GNU ARM Eclipse/OpenOCD/0.10.0-201601101000-dev/bin

Build of e2studio environment

Exporting to e2studio

  1. Go to Mbed compiler.
  2. Right click at the program you want to export.
  3. Select "Export Program"
    /media/uploads/RyoheiHagimoto/export1.png
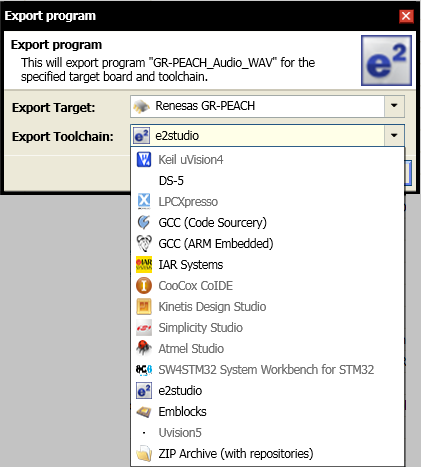
  4. Select "Renesas GR-PEACH" for Export Target
    Select "e2studio" for Export Toolchain
    Push "Export"
    /media/uploads/1050186/export_e2stutio_select_e2studio.png
  5. Expand zip file.

import project to e2studio

  1. Launch e2studio.
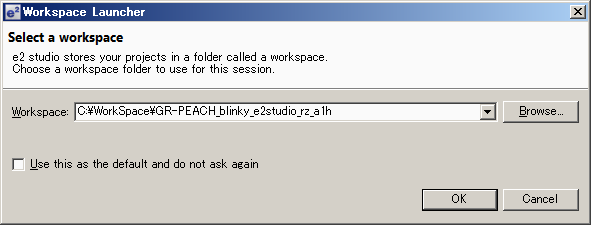
  2. Specify workspace directory. Workspace directory must be placed in the upper directory of the directory that includes .project file.
    In this document, project file is placed in C:\WorkSpace\GR-PEACH_blinky_e2studio_rz_a1h\GR-PEACH_blinky, and the workspace is placed in C:\WorkSpace\GR-PEACH_blinky_e2studio_rz_a1h.
    /media/uploads/RyoheiHagimoto/e2studio-workspace.png
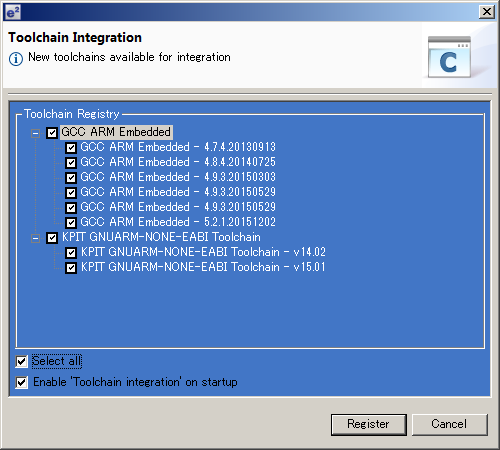
  3. If Toolchain Integration dialog appared, select [GCC ARM embedded version 4.9.3.20150529] and click [Register].
    /media/uploads/RyoheiHagimoto/e2studio-toolchain.png
  4. After e2studio window opens, click [go to workbench].
    /media/uploads/RyoheiHagimoto/e2studio-top.png
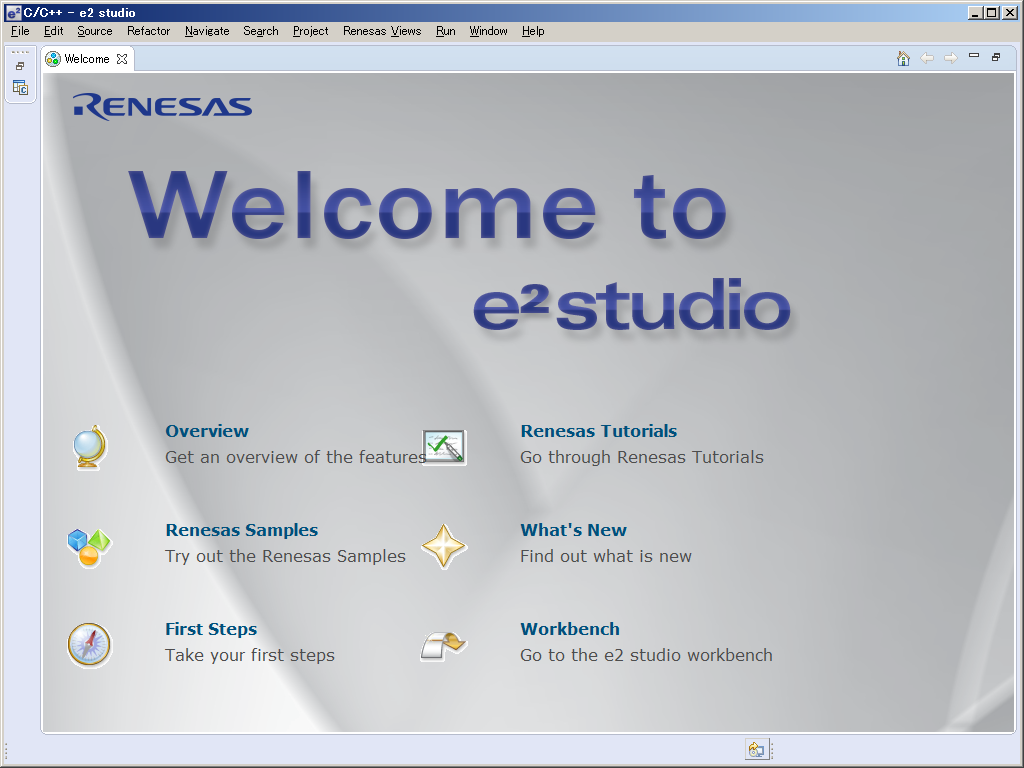
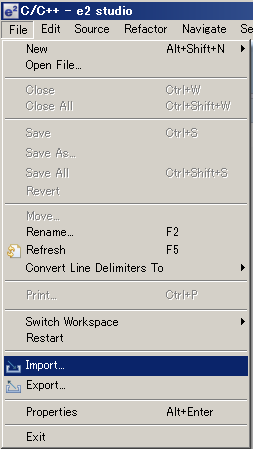
  5. Select [File]menu-[import].
    /media/uploads/RyoheiHagimoto/e2studio-import01.png
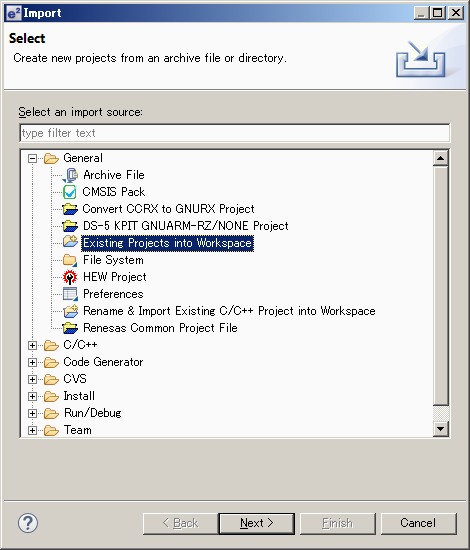
  6. Select [General]-[Existing Projects into Workspace], and click [Next>]
    /media/uploads/RyoheiHagimoto/e2studio-import02.png
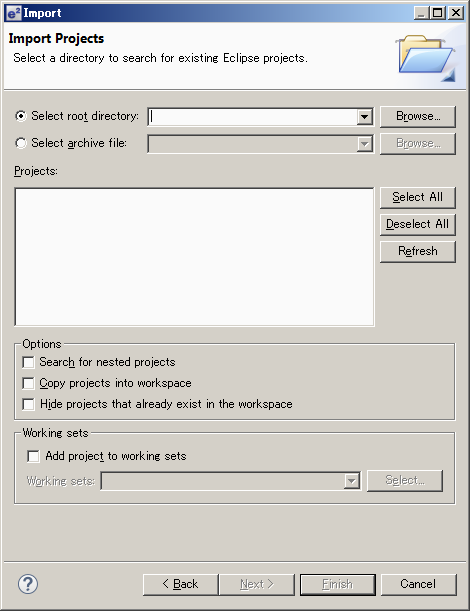
  7. Click [Browse].
    /media/uploads/RyoheiHagimoto/e2studio-import03.png
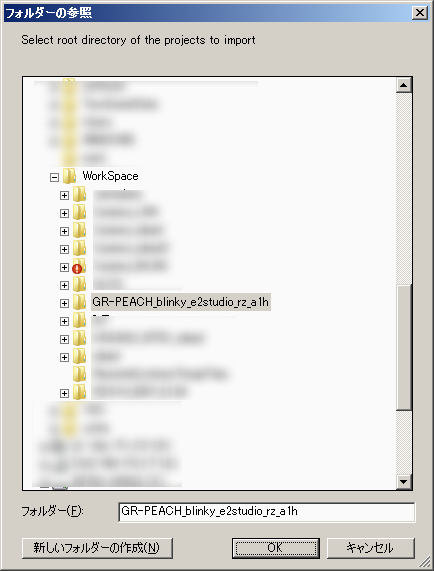
  8. Click [OK].
    /media/uploads/RyoheiHagimoto/e2studio-import04.png
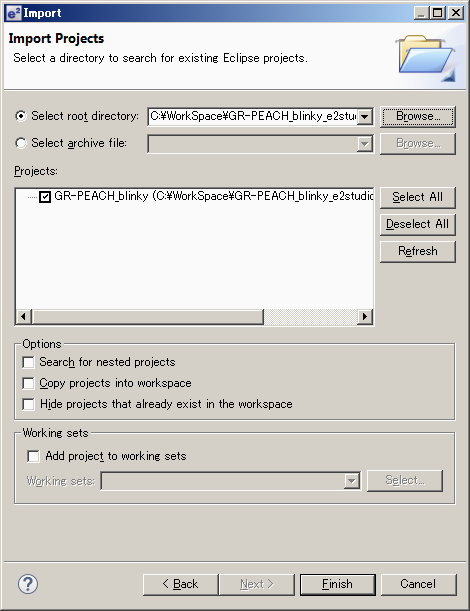
  9. Click [Finish].
    /media/uploads/RyoheiHagimoto/e2studio-import05.png

Build Process

  1. Launch e2studio.
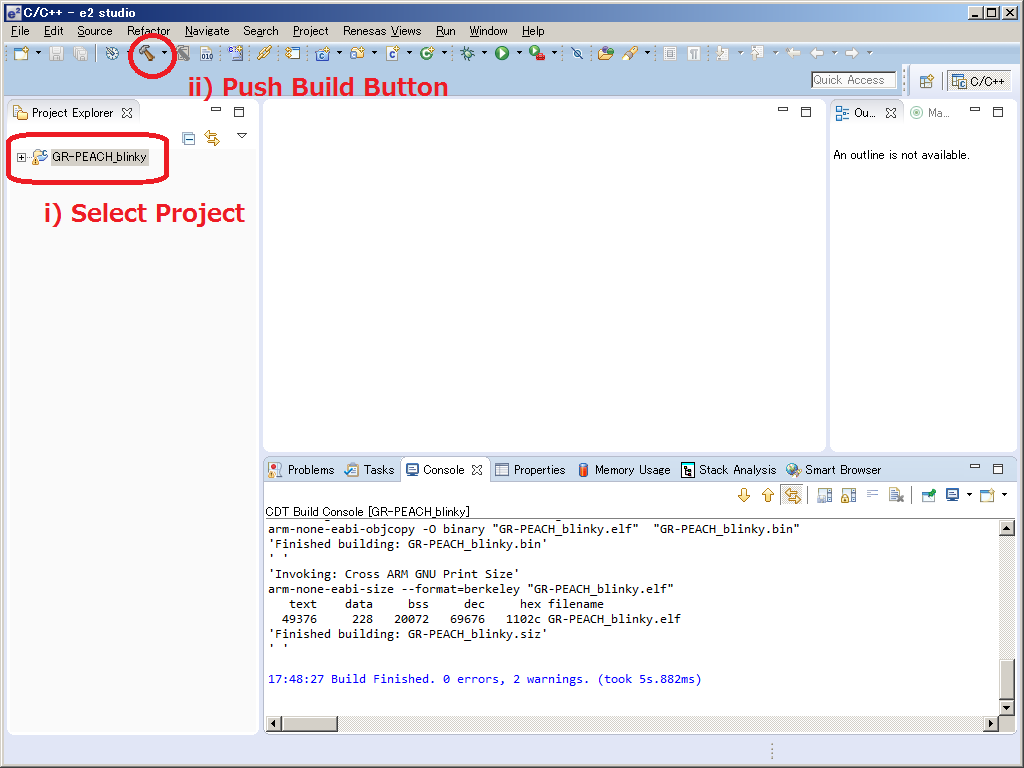
  2. Select the [Window] menu -> [Show View] -> [Project Explorer].
  3. Select the project to build.
  4. Click build icon. /media/uploads/RyoheiHagimoto/e2studio-build.png

1 2 3 4 5 6 7 8 9 10 11 12 13 14 15 16 17 18 19 20 21
  e.g.) The folder structure when making the work folder "C:\Workspase". Export project is GR-PEACH_blinky.
    C:
    +-- Workspace
        +-- GR-PEACH_blinky_e2studio_rz_a1h
            +-- .metadata
            +-- GR-PEACH_blinky
                |   .cproject
                |   .gdbinit
                |   .hgignore
                |   .project
                |   exporter.yaml
                |   GettingStarted.htm
                |   GR-PEACH_blinky OpenOCD.launch
                |   main.cpp
                |   mbed.bld
                |   SoftPWM.lib
                +-- .hg
                +-- .settings
                +-- Debug <- When clicking [Build Project], ".bin" and ".elf" file will be created here.
                +-- mbed
                +-- SoftPWM

The way to debug

Debug

  1. Connect USB cable
  2. Copy ".bin" file to Mbed drive
  3. Reconnect USB cable
  4. Select project to debug.
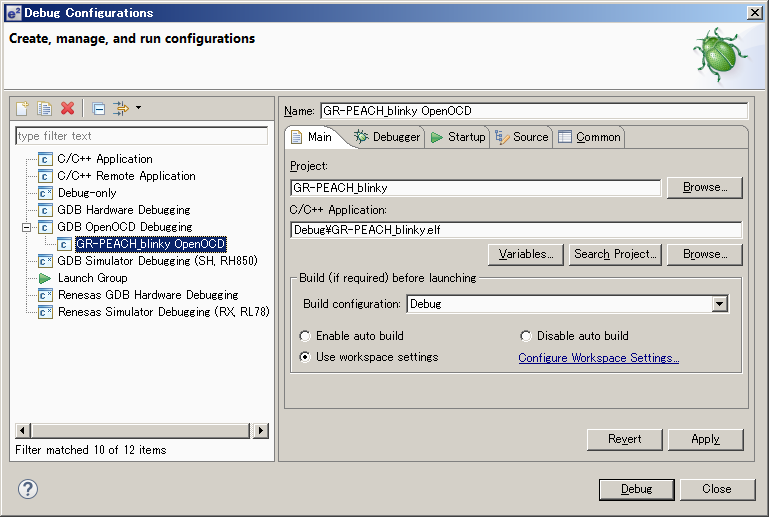
  5. From menu in C/C++ perspective or debug perspective , select [Run] [Debug Configurations...]
  6. Select [<project-name> OpenOCD] in [GDB OpenOCD Debugging]
    /media/uploads/RyoheiHagimoto/e2studio-debug.png
  7. Click "Debug".
  • If you want to reset :
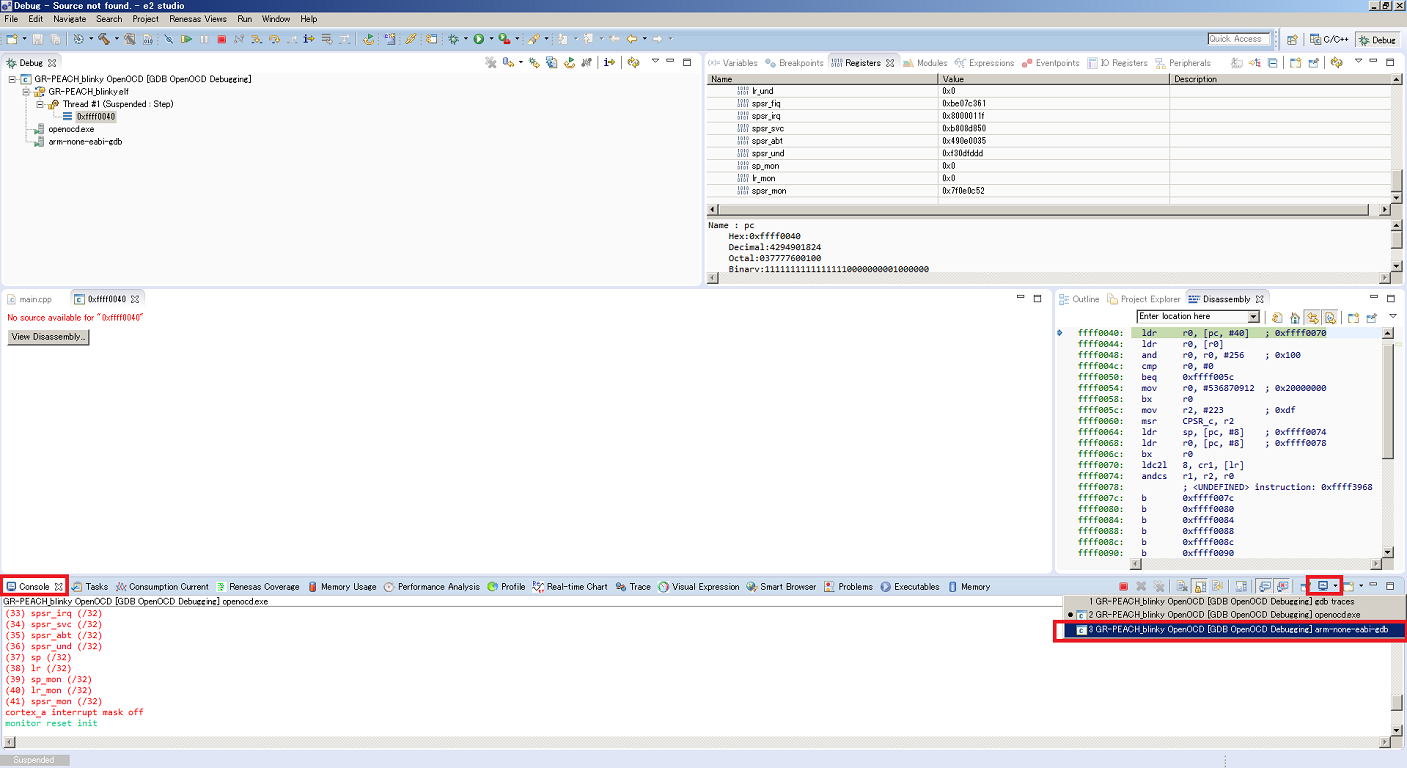
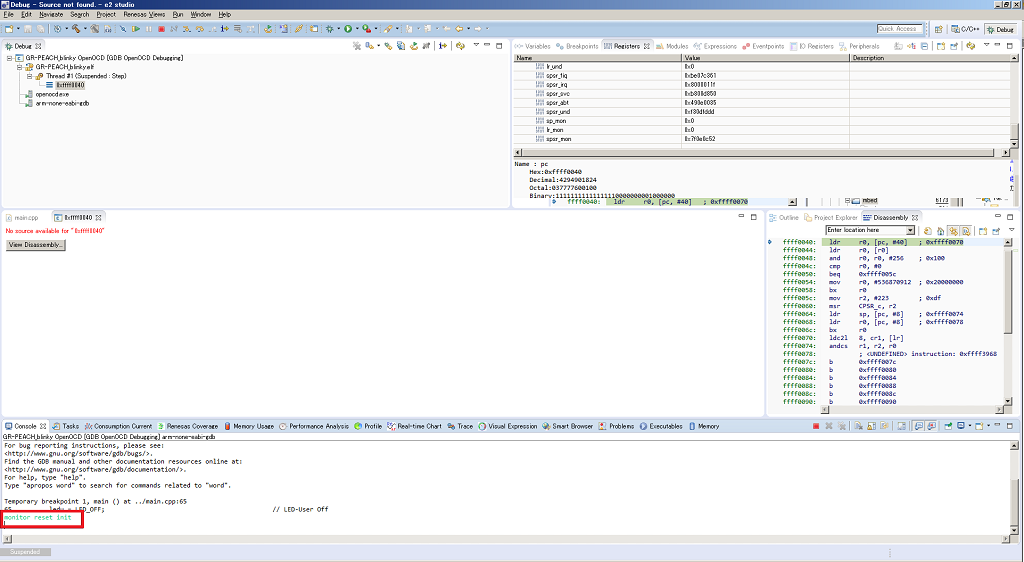
    please enter the following command to "arm-none-eabi-gdb.exe" screen in "console" view.
    When you drop down from the console view toolbar buttons, you can switch the screen.
monitor reset init
/media/uploads/1050186/e2studio-thewaytoreset1.png /media/uploads/1050186/e2studio-thewaytoreset2.png

Support features

These features are supported. Generic views which uses the features below would be useable.
Debugging featureResumeSuspendStep inStep overStep returnResetMemory R/WDownloadCPU register R/WSoftware breakpointHardware breakpointWatchpoint
CMSIS-DAP4.4.4.5.3.2.1.1.-
J-Link
  1. Software breakpoint will be replaced with Hardware breakpoint. 6 points are available in total.
  2. Downloading from e2 studio to serial flash memory is not supported. But you can download the program by copying the bin file to the drive which is generated when you connect the board to PC, because GR-PEACH is Mbed device. Before you download the program by the manner of Mbed, please disconnect the debugger from the board.
  3. Reading or writing memory while program is running are not supported. And writing is supported only for RAM.
  4. .gdbinit is required to stepping the program which uses interrupt.
  5. The button for reset in Debug View doesn't work, but the command to reset is available. Please enter "monitor reset init" to reset the program in the console for GDB (arm-none-eabi-gdb).
    Although the display is not changed, but the program would be reset. The button for restart will work once. Please don't use it.
e2 studio has the special views for Renesas. The supported status are below.

Thursday, October 3, 2019

uvc command

uvc command

Name

uvc - Interface to UVC cameras using libuvc

Synopsis

package require tcluvc
uvc option ?arg ...?

Description

This command provides several operations to interface UVC USB cameras using the infrastructure provided by libuvc and libusb which is available on common Linux, FreeBSD, and MacOSX platforms and sometimes found working on Android devices. option indicates what to carry out. Any unique abbreviation for option is acceptable. The valid options are:
uvc close devid
Closes the device identified by devid which has been opened before using uvc open.
uvc convmode devid ?flag?
Reports or modifies the conversion mode for frames acquired from the opened device identified by devid. Conversion mode 1 (on/true) performs frame format/color space conversions in the special UVC thread which controls the USB transfers, mode 0 (off/false) does this instead in the normal Tcl event loop. The default mode is 1.
uvc counters devid
Reports a three element list of statistic counters on the device identified by devid. The first element is the number of video frames received, the second the number of video frames processed with uvc image, and the third the number of video frames dropped.
uvc devices
Returns device information which can be used for uvc open as a list. Each device adds three elements to the list: the first element is the device name as a colon separated string with two or three fields being vendor ID (hexadecimal, 0x prefix is optional), product ID (hexadecimal, 0x prefix is optional), and bus/device numbers separated by a dot; the second and third list elements are the vendor name, and the product name. To open the device, its name (the colon separated string) must be used, the other two items are available for presentation purposes. If udev support is available (Linux specific), this list is refreshed on plug and unplug of devices. Otherwise, the list is a snapshot of suitable devices currently connected.
uvc format devid ?index fps?
Returns or changes the frame format of the device identified by devid. The optional parameter index is an integer number giving the index of the frame format returned in uvc listformats. The optional parameter fps is the frame rate. If omitted, the currently active index and frame rate are returned. Changing the frame format and rate is only possible if the device is not capturing images.
uvc greyshift devid ?shift?
Returns or sets the bit shift to be applied on grey images with a bit depth higher than 8 which are captured from device devid. The default value is 4, which is suitable for greyscale cameras with 12 bit resolution. The shift is not applied when the image subcommand retrieves raw byte array data.
uvc image devid ?photoImage?
Copies the most recent captured image of the device devid into the photo image identified by photoImage and returns non-zero on success or zero if no data transfer has taken place. If photoImage is omitted, a four element list is returned with the first element being the image width, the second the image height, the third the number of bytes per pixel, and the last the image's RGB values with 3 bytes per pixel in red, green, blue order as a byte array. In this case an error is indicated by throwing an exception.
uvc info ?devid?
Returns information on open devices. If devid is specified, a list of two elements is returned, the first being the device nameand the second the image callback command for that device, i.e. the same arguments which were used on uvc open. If devid is omitted, a list of devids, i.e. all currently opened devices is returned.
uvc listen ?callback?
Retrieves or sets the callback command called on plug and unplug of devices. When a device is plugged or unplugged that callback is invoked with two additional arguments: the type of event (add or remove) and the device name (see uvc devices for the naming convention) which was added or removed. Only usable if udev support is available.
uvc listformats devid
Returns a dictionary keyed by a format index as integer with the values being another dictionary with information about the frame size and rate of the respective frame format. The returned indices can be used in in uvc format to switch to another frame size and/or to change the frame rate.
uvc mbcopy bytearray1 bytearray2 mask
Copies the content of RGB byte array bytearray2 into the byte array bytearray1 using an RGB mask. Both byte arrays must have identical length which must be a multiple of 3 (for RGB). The main purpose of this command is to combine images from two cameras into an anaglyph 3D, where (for a red-cyan anaglyph) the left camera image uses mask 0xFF0000 (red component) and the right camera image uses mask 0x00FFFF (green and blue components).
uvc mcopy photo1 photo2 mask
Copies the content of the photo image photo2 into the photo image photo1 using an ARGB mask. Both photo images must have identical width, height, and depth. The main purpose of this command is to combine images from two cameras into an anaglyph 3D, where (for a red-cyan anaglyph) the left camera image uses mask 0x00FF0000 (red component) and the right camera image uses mask 0x0000FFFF (green and blue components).
uvc mirror devid ?x y?
Retrieves or sets flags to mirror captured images along the X or Y axis. Parameters x and y if specified must be boolean values.
uvc open devname callback
Opens the device with device name devname and establishes callback as command to be invoked on captured images and finally returns a devid, i.e. a handle to further deal with the device. An additional parameter is appended when callback is invoked: the devid of the device. For the format of devname see the description of uvc devices.
uvc orientation devid ?degrees?
Retrieves or sets the orientation of captured images regarding image rotation. degrees if specified must be an integer number.
uvc parameters devid ?key value ...?
Returns or changes device parameters for the device identified by devid given as key-value pairs, e.g. brightness 100 will change the brightness setting of captured images to the device dependent value 100. The command returns the current device parameters (after the potential change, when keys and values were given) as a key-value list which can be processed with array set or dict get.
uvc record devid frame width height bpp bytearray
Transcodes the frame described by widthheightbpp, and bytearray to JPEG and writes the result to the recording file or stream. The recording must have been started with the -user option. An integer number is returned as result: 1 indicates successful write, 0 no write due to frame rate constraints, and -1 an error during the write.
uvc record devid pause
Pauses recording to a file or stream.
uvc record devid resume
Continues recording to a file or stream.
uvc record devid start options ...
Starts recording to a file or stream. options control the data format, frames per second, and output channel. The option -fps specifies the approximate rate in frames per second as a floating point number. The option -chan specifies the channel to which the frames are written. This channel is detached from the Tcl interpreter and controlled solely by the uvc record command. The -boundary option specifies a MIME multipart boundary string and selects the MIME type multipart/x-mixed-replace suitable for streaming to a web browser. The content type delivered to the browser is image/jpeg. If the -boundary option is omitted, the output format is raw AVI and requires the channel to be seekable. The option -mjpeg forces the recorded data to JPEG format, i.e. a transcoding to JPEG will be performed in software, if the device doesn't already deliver a JPEG stream. The option -user turns off automatic frame write operations to the recording file or stream when a frame is delivered from the device. Instead, uvc record devid frame must be invoked in the callback function. The -user option implies -mjpeg.
uvc record devid state
Returns the current recording state as stoprecordingpause, or error. The state error indicates a write error on the file or stream. In this case no further frames will be written.
uvc record devid stop
Finishes recording to a file or stream and closes the underlying channel.
uvc start devid
Starts capturing images of the device identified by devid. When an image is ready, the callback command set on uvc open is invoked.
uvc state devid
Returns the image capture state of the device identified by devid. The result is the string capture if the device is started, stopped if the device is stopped, or error if an error has been detected while image capture was active.
uvc stop devid
Stop capturing images of the device identified by devid.
uvc tophoto width height bpp bytearray ?rot mirrorx mirrory?
Makes the RGB (bpp is 3) or gray (bpp is 1) byte array bytearray of width times height pixels into a Tk photo image. Optionally, the data is rotated by rot degrees (possible values 0, 90, 180, 270) and/or mirrored along the X and/or Y axis as specified by the boolean values mirrorx and mirrory.
The uvc command tries to lazy load Tk, thus allowing to use it from a normal tclsh. Only when a photo image is required by a subcommand, Tk must be available and an attempt to load it is made.